The ultimate guide to WordPress backups


In this comprehensive guide tailored for WordPress users, we’ll delve into the critical topic of WordPress backups. We’ll outline various scenarios where backups are a lifesaver, from accidental content deletion to server crashes. By the end of this guide, WordPress users will be well-equipped to ensure the security and continuity of your websites through effective backup strategies.
Why WordPress backups are essential
Backing up a website is an essential practice for any website owner, regardless of their experience level. Websites can be compromised by outside parties, experience crashes after upgrades, or fail due to human error. In these situations, having a saved copy of your files and data becomes invaluable. Keeping a recent backup of your website not only saves time but also reduces stress and downtime.
Protecting against unforeseen disasters
Accidents happen. You might accidentally delete important content or make changes that negatively impact your website’s functionality. Recovering from such mishaps can be a painstaking process without a backup. However, with a reliable backup, you can easily restore your website to its previous state, minimizing the impact of any unforeseen disasters.
Safeguarding against cyber threats
Cyber threats are a constant concern. Hackers can exploit vulnerabilities in your website’s security to compromise your data. Regularly backing up your website can mitigate the risks of data breaches and quickly restore it to a secure state if it ever falls victim to an attack.

Ensuring business continuity
For businesses that rely heavily on their websites, any downtime can lead to lost revenue and a damaged reputation. Whether it’s a server crash or a major technical glitch, having a recent backup allows you to quickly restore your website and minimize the impact on your business operations. It ensures that customers can access your website without interruption and helps maintain your online presence.
Best practices for WordPress backups
Creating backups is just the first step. To ensure the effectiveness of your backup strategy, consider implementing the following best practices:
Regularly scheduled backups
Manually creating backups can be a time-consuming task. To streamline the process and ensure backups are always up-to-date, opt for automatic backups. Schedule regular backups to run at convenient intervals, such as daily or weekly, depending on the frequency of changes to your website.
Multiple backup locations
Storing backups in multiple locations is crucial to avoid a single point of failure. Consider utilizing cloud storage services like Google Drive, Dropbox, or OneDrive to store your backups securely. This way, even if your server experiences a catastrophic failure, you’ll still have access to your backups.

Test your backups
Don’t wait for a disaster to strike before testing your backups. Regularly test the restoration process to ensure that your backups are functioning correctly. This practice will give you peace of mind, knowing that you can quickly recover your website in the event of a real emergency.
Keep backups offsite
While cPanel and EasyWP offer convenient backup solutions, it’s essential to keep backups offsite for added security. Store backups on external servers, cloud storage, or physical devices that are separate from your web hosting environment. This precaution protects your data from potential server failures or security breaches.
Choosing the right backup solution
There are various options available when it comes to WordPress backups. In this guide, we’ll focus on two popular Namecheap services: EasyWP and Namecheap shared hosting. These services offer reliable backup solutions with user-friendly interfaces that make the backup process hassle-free.
EasyWP backup management
EasyWP is a managed WordPress hosting service provided by Namecheap. It offers a seamless backup management system that allows users to create, restore, and download backups with ease.
Creating a backup with EasyWP
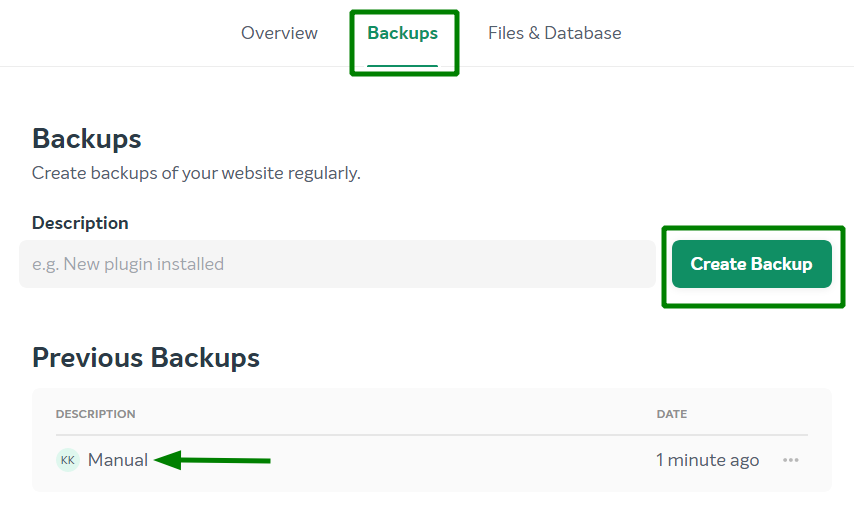
To create a backup of your WordPress application using EasyWP, follow these steps:
- Log in to your EasyWP Dashboard and select the website for which you want to create a backup.
- Navigate to the Backups tab.
- Enter a descriptive name for the backup in the Description field.
- Click on the “Create Backup” button.

Once the backup is generated, it will be visible in the list of available backups. You will receive a confirmation email at your Namecheap contact email address and a corresponding notification in your EasyWP Dashboard.
Downloading a backup with EasyWP
To download a backup of your WordPress application using EasyWP, follow these steps:
- Log in to your EasyWP Dashboard and select the website for which you want to download a backup.
- Navigate to the Backups tab.
- Locate the desired backup in the list and click on the “More” option.
- Choose either “Download Database” or “Download Files” to download the corresponding TAR archive to your local PC.
Restoring a backup with EasyWP
If and when you need to restore your WordPress site using EasyWP, here’s how:
- Log in to your EasyWP Dashboard and pick the website you want to restore.
- Backup Selection: Click on “WordPress Backups.” You’ll see your available backups.
- Pick the backup you want to restore. Click the “More” (represented by three dots) icon for that backup.
- In the menu that appears, choose “Restore.”
- Note: Once the restoration starts, it can’t be stopped. Your current content will be replaced with the data from the backup. But don’t worry. An automatic backup is created just before the restore begins, so you can return to it if needed.
- After the backup restoration finishes, you’ll receive a notification. Your website is now back to how it was when you selected that backup.

Find detailed, step-by-step instructions on website backups with EasyWP in our knowledgebase.
cPanel backup management
If you’re using Namecheap shared hosting, cPanel provides a robust backup management system that allows you to create and restore backups of your entire cPanel account, including databases, email accounts, and settings.
Creating a full cPanel backup
To create a full cPanel backup, follow these steps:
- Log in to your cPanel account and navigate to the Files section.
- Click on the Backup menu.
- Select “Download a Full Website Backup.”
- By default, the backup will be saved in your account’s home directory. If desired, you can change the backup destination.
- Click on the “Generate Backup” button to initiate the backup process.
The backup generation process will start, and you can monitor its progress in real-time. Once completed, you can download the backup or check if it’s stored on a remote server.
Restoring a full cPanel backup
Restoring a full cPanel backup depends on your hosting environment. If you have a VPS or Dedicated server with root access, you can restore the backup yourself in WHM. However, if you have a Stellar or Reseller package, you’ll need to submit a ticket to the Hosting department for assistance.
To restore a full cPanel backup on your side, navigate to the AutoBackup menu in cPanel (available for Stellar Plus and Stellar Business plans) or use the “Restore a Home Directory Backup” option. Select the backup file you wish to restore and initiate the restoration process.
Find detailed, step-by-step instructions on website backups with shared WordPress hosting in our knowledgebase.
While the backup steps described in this guide are highly relevant for most users with Namecheap hosting products, it’s essential to note that the backup process can vary significantly with other hosting companies. Different hosting providers may offer distinct backup solutions and management interfaces.
If you’re not using Namecheap hosting services, we recommend consulting your hosting provider’s documentation or support team to understand their specific backup procedures. It’s crucial to ensure that your backup strategy aligns with your hosting environment to guarantee the security and availability of your WordPress website.
Backup, edit, backup, repeat
WordPress backups are a crucial aspect of website management. They safeguard your website against unforeseen disasters, cyber threats, and downtime. By following the step-by-step instructions provided in this guide, you can easily create and restore backups using Namecheap services like EasyWP and cPanel. Remember to implement best practices such as regular automatic backups, storing backups in multiple locations, and testing your restoration process. With a robust backup strategy in place, you can have peace of mind knowing that your WordPress website is secure and protected.
If you found this guide on WordPress backups valuable, you should also delve into our article covering cloud security best practices. Our comprehensive guide will equip you with the knowledge and strategies needed to fortify your online presence against a range of threats.
