Your complete guide to third-party API plugins for WordPress


Have you ever wished your WordPress site could do more? Maybe you want to display live weather updates, integrate an interactive map, or automate your email marketing.
If these pain points sound familiar, you’re not alone. Many WordPress site owners are looking for ways to extend their site’s functionality without understanding complex coding. The good news? Third-party WordPress API integration can help you achieve all this and more.
By connecting your site with external services, APIs will make your site more dynamic, efficient, and engaging to visitors. Curious to see how this can transform your site? In this complete guide we’ll explore the top benefits of integrating APIs with your WordPress site, steps on how to connect and use third-party APIs, and more.
Getting to grips with WordPress API integration
APIs act as intermediaries that enable different software applications to communicate with each other. For WordPress users, this means you can pull in data or services from other platforms, such as social media feeds, payment gateways, or marketing tools, directly into your website.

But what are the key benefits of connecting third-party APIs to your WordPress site?
Top 4 reasons to integrate APIs with WordPress
1. Extend functionality without complex code
APIs allow you to add new features to your site without extensive coding. For example, integrating the Google Maps API enables you to display interactive maps on your contact page or within blog posts. This added functionality can significantly improve user engagement by providing more interactive and useful elements on your site. What’s more, you can integrate booking systems, live chat services, and other advanced features that propel your site’s overall capabilities.
2. Automate to improve efficiency
Automating tasks through APIs can save you time and effort. For instance, you can use the MailChimp API to automatically update your email lists based on new user registrations or purchases. This automation reduces manual data entry and ensures your marketing efforts are always up-to-date. Similarly, APIs can streamline data retrieval processes, such as pulling in the latest news articles or social media updates, allowing you to focus on other important aspects of your business.
3. Enhance user experience
Offering visitors more dynamic and interactive content can massively improve their experience on your site. APIs enable you to integrate features like real-time weather updates, stock market data, or personalized content recommendations. By providing relevant and timely information, you can keep users engaged and encourage them to spend more time on your site. Creating the best user experience often leads to higher customer satisfaction and increased conversion rates.
4. Seamless integration
Connecting your site with popular services like Google Maps, MailChimp, or X ensures a smooth and cohesive experience for your users. For example, embedding an X feed on your site allows visitors to see your latest tweets without leaving your webpage. This seamless integration keeps users engaged and helps maintain a consistent brand presence across different platforms. Plus, it simplifies user interactions by allowing them to perform multiple actions, such as subscribing to newsletters or following social media accounts, directly from your site.
Steps to integrate a third-party API plugin
Integrating a third-party API into your WordPress site might seem daunting, but it’s manageable with the right approach. This section will guide you through the process step-by-step, from choosing the right API to adding its functionality to your site.
1. Choose the right API
First, identify the functionality you need and select a suitable API. Research the API documentation to understand its features, limitations, and pricing. Some popular APIs for WordPress include Google Maps API for displaying maps and location data, X API for embedding tweets and user timelines, and MailChimp API for managing email subscriptions and campaigns.
2. Get API credentials
To use an API, you’ll typically need an API key or token, which you obtain by signing up for the service. Follow these steps to get your API credentials:
- Sign up for the API service.
- Navigate to the API settings or developer section.
- Generate and copy your API key.
For example, this guide explains about generating a Google Maps Platform API key.
3. Install a WordPress API plugin
Many APIs have WordPress plugins that simplify the integration process. Here’s how to do it:
- Find the right plugin — Go to your WordPress dashboard and click on “Plugins.” From there, click on “Add New.” Use the search bar to find a plugin that matches the API you wish to integrate. For example, if you want to integrate Google Maps, you might search for “Google Maps API.” WP Go Maps (formerly WP Google Maps), for example, lets you add a customized Google map, map block or Store Locator to your WordPress posts.

- Install the plugin — Once you’ve found a suitable plugin, click “Install Now.” WordPress will download and install the plugin files for you. After installation, click “Activate” to enable the plugin on your site.
- Verify compatibility — Before installing a plugin, ensure it’s compatible with your version of WordPress. Check user reviews and the plugin’s last update date to confirm it’s well-maintained. Compatibility is crucial to avoid conflicts and ensure smooth operation.
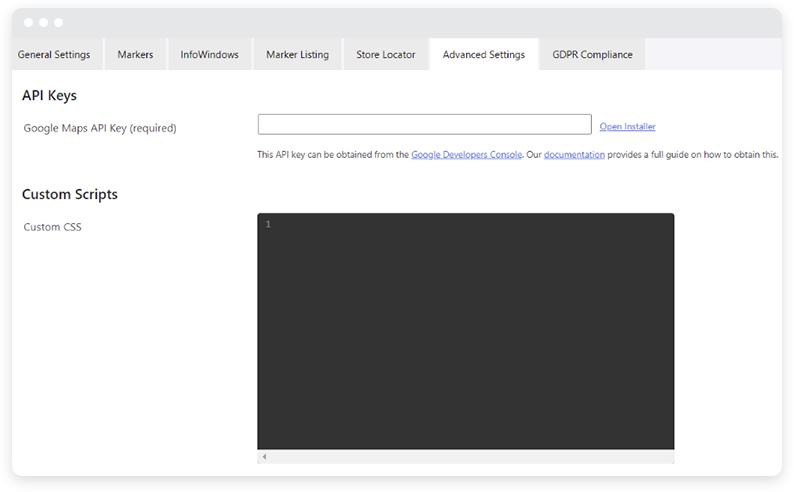
- Configure the plugin — After activation, go to the plugin’s settings page. You’ll typically find this under the “Settings” menu or in a new menu item created by the plugin. Enter your API key or token as required. Each plugin may have different settings, so follow the documentation provided by the plugin author.

- Test the integration — Once configured, test the plugin to ensure it’s correctly interacting with the API. For example, if you installed a social media plugin, check if it’s fetching the latest posts or tweets as expected. This step ensures that everything is working before you roll it out on your live site.
- Manage updates — Keep your plugins updated to benefit from new features, security patches, and bug fixes. Regular updates help maintain compatibility with the latest WordPress version and other plugins.
4. Add WordPress API integration to your site
With the plugin configured, you can now add the API’s functionality to your site. This usually involves using shortcodes, widgets, or custom blocks within your WordPress editor.
- Insert shortcodes — Many plugins provide shortcodes that you can insert into posts or pages to display API content. For example, the WP Go Maps shortcodes are located below under the “Maps” tab.

- Use widgets — If the plugin offers widgets, you can add them to your sidebars or footer areas. Go to “Appearance” > “Widgets” in your WordPress dashboard and drag the desired widget to your preferred location. Configure the widget settings as needed.
- Custom blocks — With the Gutenberg editor, some plugins offer custom blocks that you can add to your posts or pages. Look for new block types added by the plugin and insert them using the block editor. Customize the block settings to suit your needs.
- Template integration — For more advanced customization, you might need to edit your theme templates. This could involve adding PHP code snippets provided by the plugin or API documentation. Always use a child theme to avoid losing changes during theme updates.
- Styling and customization — Customize the appearance of the API content to match your site’s design. This can include adding custom CSS or using the plugin’s styling options. Ensuring a consistent look and feel enhances user experience.
Integrating third-party APIs can transform your WordPress site, offering new features and improved functionality. By following this guide, you can seamlessly connect with external services, automate processes, and provide a richer experience for your users.
WordPress API integration is just one of the ways you can extend the functionality of your website. Check out our top new WordPress plugins for business in 2024 to boost your online presence.
