Increase page speed with a WordPress image optimizer


You might have the best content in town, but if your site runs slow, people aren’t going to stick around long enough to see it. That’s why it’s time to speed up your pages with a WordPress image optimizer.
Cast your mind back to the early days of the internet — case in point the website for the movie Space Jam— even those LoFi graphics took forever to load. It was frustrating back then, but we got on with it. Fast Forward to 2020 and we’re having none of it. According to Kissmetrics 40% of people will abandon a website if it takes more than three seconds to load.
It’s safe to say that every second counts these days, so why drive people away when you can reel them in instead? How, you ask? Optimize your images. Using a WordPress image optimizer just happens to be one of the most straightforward fixes for speeding up a website. With a few clicks, you can make your site lighter and run quicker!
Let’s get started.
Speed Matters
Whether you’re a small business or an individual with a website, you need to be proactive about site speed. Optimizing images is one way to make pages load faster. Before we cover how it’s done, It’s important to understand that improving site speed is the sum of several elements combined: CDN, caching, and image optimization:
CDN
A Content Delivery Network (CDN) is a distributed network of servers. The idea behind CDN is to reduce the distance between someone browsing the internet, and the web server delivering the content. This works by copying your site on many data servers worldwide.
Let’s say someone from England accesses your site based in the US. Instead of a server in America sending the information, a local server in the UK, holding a version of your site, sends it directly to them, speeding the loading time up considerably.
Caching
In simple terms, caching means that the web browser remembers things that you have recently looked at, to deliver the content faster. If someone lands on your website and you don’t have caching enabled, their browser requests the entire page from your server, again. With caching, they get it in a snap. You’ll experience significantly faster load times but also decrease the load on your server.
Image optimization
Image optimization reduces your image file size as much as possible. When done properly, your photographs look great and your pages load quickly. You might have fantastic web hosting, but there is only so much that it can do if you’ve failed to take care of your JPG and PNG images behind the scenes.
Think about how web pages look these days. To grab our attention and draw conversions, websites are all singing, all dancing, feasts for the eyes. But what does this mean for web pages? They are increasingly graphical and image-heavy.

According to HTTP Archive, as of 1st October 2020, previously uploaded images make up on average 47% of a total webpage’s weight. It’s easy to overlook or simply forget that regularly adding pictures and images to your site gradually affects its speed. Since we know that faster websites boost search engines (SEO), image compression is a must for every website if they want to succeed online.
Since there is no universal method to fix page speed, we recommend that you implement all of the methods mentioned above. This post is about image compression because it’s the one method you can’t delegate the task to a web host — which is what we recommend.
The most straightforward way to add CDN and caching is through a Managed WordPress host. With EasyWP Managed WordPress hosting, for example, you get a global network of servers set up for you a caching plugin pre-installed with WordPress. It’s also the fastest WordPress hosting available so you won’t need to worry about losing precious seconds on account of your web hosting performance.
How to use a WordPress image optimizer
Image optimization can be done manually or with the help of an image compression plugin. The manual approach is for anyone who prefers to do everything independently and maintain ultimate control over their website. As with most things in WordPress, plugins have simplified the job. Image optimization plugins save a lot of time while delivering fantastic results.
We’ll look at the plugins later, but first, let’s begin with the do-it-yourself method.

Optimize images manually
When we talk about image optimization, we’re covering a lot of ground. From choosing the correct image format to adjusting the size, and final image compression to make sure it’s as light as a feather. Here’s an overview of what’s involved in doing it yourself:
- Convert to file formats that offer smaller sizes with better image quality. (JPEG vs GIF vs. PNG)
- Find the maximum size your image is displayed at, this is the maximum size your image needs to be, and resize your images. Image editing tools like Photoshop or Gimp handle this.
- Finally, compress the photo file so that it consumes less space. With Compress JPEG you can compress any file format ‘with the force of an elephant’.
These three techniques can reduce your image size by up to 80%, if chosen correctly. Or you can save yourself the job of working out the right combination, and get a plugin involved.
Speed things up with a WordPress image optimizer plugin
As we’ve seen, there’s a lot of work involved to optimize an image yourself. If you prefer to put this task on autopilot, you need the right tools for the job, aka a WordPress Image Optimizer plugin.
A number of free plugins for reducing image size exist on the web, for example. They all have different features and allow you to find the configuration you need. We recommend using ShortPixel Image Optimizer
ShortPixel optimizes freshly uploaded existing images on your site without sacrificing image quality. Besides automated optimization, you get control over your level of compression and image formats. You can download the ShortPixel plugin from the WordPress library.
Before we get started you might be interested in testing your page speed now, and then again once the images on your WordPress site have been optimized.
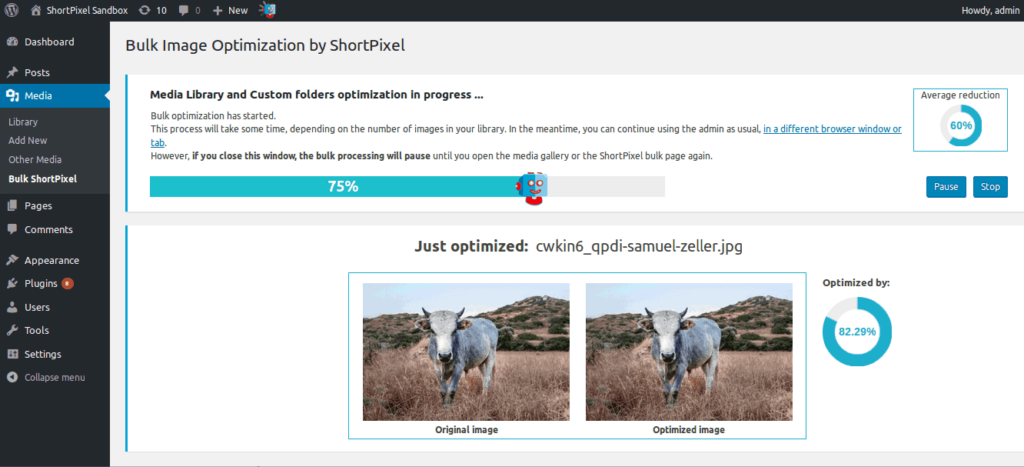
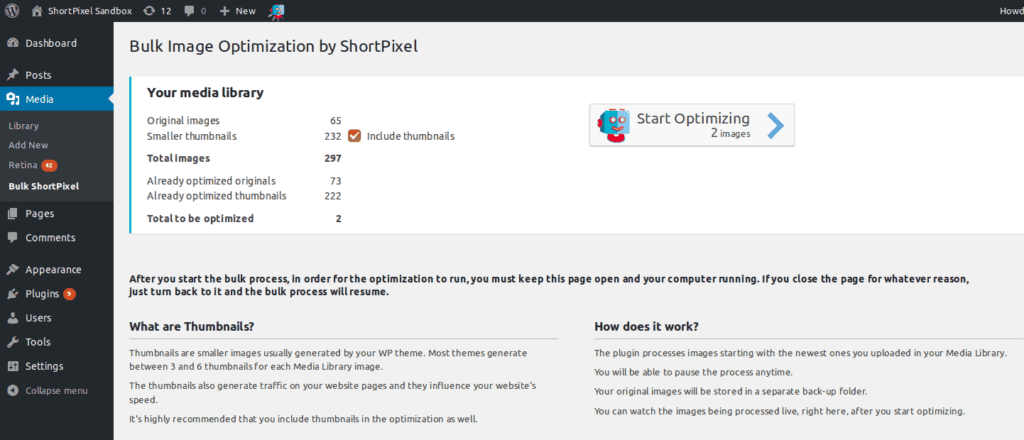
- To begin, launch WordPress, and install and activate the plugin. Then select the new option Bulk ShortPixel within the Media tab.

- In the Bulk Image Optimization screen, click Start Optimizing.

ShortPixel has free version and a variety of premium features available. Watch this short video from the developers to see hands-on examples of this great plugin in action.
That’s all there is to it! To see how much your site speed has improved, run your WordPress pages through a page speed tool like Pingdom and test them on your mobile device!
Final thoughts on using a WordPress image optimizer plugin
If you’ve not been optimizing your images, then it’s time you started. It won’t only make a difference to your speed, but your users will appreciate it too, as will Google.
Besides image compression, we mentioned that CDN and caching would significantly help you speed up your website. You should have no trouble adding a caching plugin, but CDN is a bit more complicated to set up.
The smoothest option is to go for Managed WordPress hosting like EasyWP. With EasyWP, page speed worries will be a thing of the past, and with plans starting from $1 for your first month, you can say goodbye to overpriced hosting too.
Creating a WordPress website has never been so straightforward. EasyWP takes care of the technical heavy lifting, giving our customers all the service they’d expect from traditional Managed WordPress, with premium features at a fraction of the cost. There’s even a professional caching plugin included to save you the time and effort to set these things up yourself.
If you enjoyed this article and would like to continue learning about site speed, you may also want to check out our guide on how to speed up your website.
